著者:
    作成:2025-04-18最終更新:2026-05-31

    Intlayerを使用してAngular 21(Vite)Webサイトを翻訳する | 国際化(i18n)

    目次

    代替手段ではなく Interlayer を使用する理由

    「ngx-translate」や「​​angular-l10n」などの主要なソリューションと比較して、Intlayer は次のような統合された最適化を備えたソリューションです。

    Angular を完全にカバー

    Intlayer は、コンポーネント レベルのコンテンツ スコープ遅延読み込み、および国際化 (i18n) のスケーリングに必要なすべての機能を提供することにより、Angular と完全に連携するように最適化されています。

    バンドルサイズ

    大量の JSON ファイルをページにロードするのではなく、必要なコンテンツのみをロードします。 Intlayer は、バンドルとページのサイズを最大 50% 削減するのに役立ちます。

    保守性

    アプリケーションのコンテンツのスコープを設定すると、大規模なアプリケーションの メンテナンスが容易になります。コンテンツ コードベース全体を確認するという精神的な負担を負うことなく、単一の機能フォルダーを複製または削除できます。さらに、Intlayer は完全に型指定されており、コンテンツの正確性を保証します。

    AI エージェント

    コンテンツを同じ場所に配置すると、大規模言語モデル (LLM) によって 必要なコンテキストが削減されます。 Intlayer には、翻訳の欠落をテストする CLILSPMCP などのツール スイートも付属しています。および agent skills により、AI エージェントの開発者エクスペリエンス (DX) がさらにスムーズになります。

    オートメーション

    AI プロバイダーの費用で、選択した LLM を使用して CI/CD パイプラインで自動化を変換します。 Intlayer は、コンテンツ抽出を自動化する コンパイラー と、バックグラウンドでの翻訳を支援する Web プラットフォーム も提供します。

    パフォーマンス

    大量の JSON ファイルをコンポーネントに接続すると、パフォーマンスと反応性の問題が発生する可能性があります。 Intlayer は、ビルド時のコンテンツの読み込みを最適化します。

    非開発によるスケーリング

    Intlayer は単なる i18n ソリューションではなく、自己ホスト型 ビジュアル エディター完全な CMS を提供します。 リアルタイムで多言語コンテンツを管理できるようになり、翻訳者、コピーライター、その他のチーム メンバーとのコラボレーションがシームレスになります。コンテンツはローカルおよび/またはリモートに保存できます。

    </AccordionGroup>


    AngularアプリケーションでIntlayerをセットアップするためのステップバイステップガイド

    ide.intlayer.org
    intlayer-angular-22-template.vercel.app

    GitHubでアプリケーションテンプレートを参照してください。

    1. 依存関係のインストール

      npmを使用して必要なパッケージをインストールします:

      bash
      npx intlayer init --interactive
      
      --interactive フラグはオプションです。AI エージェントの場合は intlayer-cli init を使用してください。
      このコマンドは環境を検出し、必要なパッケージをインストールします。例えば:
      bash
      npm install intlayer angular-intlayer
      npm install @angular-builders/custom-esbuild --save-dev
      
      • intlayer

        構成管理、翻訳、コンテンツ宣言、トランスパイル、CLIコマンドのための国際化ツールを提供するコアパッケージ。

      • angular-intlayer IntlayerをAngularアプリケーションに統合するパッケージ。Angularの国際化のためのコンテキストプロバイダとフックを提供します。

      • @angular-builders/custom-esbuild Angular CLIのesbuild構成をカスタマイズするために必要です。

    2. プロジェクトの構成

      アプリケーションの言語を構成するための構成ファイルを作成します:

      intlayer.config.ts
      import { Locales, type IntlayerConfig } from "intlayer";
      
      const config: IntlayerConfig = {
        internationalization: {
          locales: [
            Locales.ENGLISH,
            Locales.FRENCH,
            Locales.SPANISH,
            // その他の言語
          ],
          defaultLocale: Locales.ENGLISH,
        },
      };
      
      export default config;
      
      この設定ファイルを通じて、ローカライズされたURL、ミドルウェアのリダイレクト、Cookie名、コンテンツ宣言の場所と拡張子、コンソールでのIntlayerログの無効化などを設定できます。利用可能なパラメーターの完全なリストについては、設定ドキュメントを参照してください。
    3. Angular構成へのIntlayerの統合

      IntlayerをAngular CLIと統合するには、カスタムビルダーを使用する必要があります。このガイドでは、Vite/esbuild(Angular 21プロジェクトのデフォルト)を使用していることを前提としています。

      まず、カスタムesbuildビルダーを使用するようにangular.jsonを変更します。buildserveの構成を更新します:

      angular.json
      {
        "projects": {
          "your-app-name": {
            "architect": {
              "build": {
                "builder": "@angular-builders/custom-esbuild:application", // replace "@angular/build:application"
                "options": {
                  "define": {
                    "process.env": "{}",
                  },
                  "plugins": ["./esbuild.plugins.ts"],
                  "browser": "src/main.ts",
                  // ...
                },
              },
              "serve": {
                "builder": "@angular-builders/custom-esbuild:dev-server", // replace "@angular/build:dev-server"
                "options": {
                  "prebundle": {
                    "exclude": [
                      "intlayer",
                      "angular-intlayer",
                      "@intlayer/config/built",
                      "@intlayer/core"
                    ]
                },
              },
            },
          },
        },
      }
      
      angular.json内のyour-app-nameをプロジェクトの実際のプロジェクト名に置き換えることを忘れないでください。

      次に、プロジェクトのルートにesbuild.plugins.tsファイルを作成します:

      esbuild.plugins.ts
      import { intlayerEsbuildPlugin } from "angular-intlayer/esbuild";
      
      export default [intlayerEsbuildPlugin()];
      
      intlayerEsbuildPlugin関数はesbuildにIntlayerを設定します。コンテンツ宣言ファイルを処理するプラグインを注入し、最適なパフォーマンスのためのエイリアスを設定します。

      NX ユーザー: NX の Angular ビルダーは、Node のネイティブ ESM 解決を介してプラグインファイルをロードし、TypeScript プラグインファイルをその場でコンパイルしません。代わりに .mjs ファイルを使用し、それに応じて angular.jsonplugins 参照を更新してください:

      esbuild.plugins.mjs
      import { intlayerEsbuildPlugin } from "angular-intlayer/esbuild";
      
      export default [intlayerEsbuildPlugin()];
      

      その後、angular.json"./esbuild.plugins.ts" の代わりに "./esbuild.plugins.mjs" を指定します。

    4. コンテンツの宣言

      翻訳を保存するためにコンテンツ宣言を作成および管理します:

      コンテンツ宣言は、contentDirディレクトリ(デフォルトでは./src)に含まれている限り、アプリケーション内のどこにでも定義できます。また、コンテンツ宣言ファイルの拡張子(デフォルトでは.content.{json,ts,tsx,js,jsx,mjs,cjs,md,mdx,yaml,yml})と一致している必要があります。
      詳細については、コンテンツ宣言のドキュメントを参照してください。
    5. コードでIntlayerを活用する

      Angularアプリケーション全体でIntlayerの国際化機能を活用するには、アプリケーションの構成でIntlayerを提供する必要があります。

      src/app/app.config.ts
      import { ApplicationConfig } from "@angular/core";
      import { provideRouter } from "@angular/router";
      import { provideIntlayer } from "angular-intlayer";
      import { routes } from "./app.routes";
      
      export const appConfig: ApplicationConfig = {
        providers: [
          provideRouter(routes),
          provideIntlayer(), // ここにIntlayerプロバイダを追加します
        ],
      };
      

      次に、任意のコンポーネント内でuseIntlayer機能を使用できます。

      src/app/app.component.ts
      import { Component } from "@angular/core";
      import { RouterOutlet } from "@angular/router";
      import { useIntlayer } from "angular-intlayer";
      
      @Component({
        selector: "app-root",
        standalone: true,
        imports: [RouterOutlet],
        templateUrl: "./app.component.html",
        styleUrl: "./app.component.css",
      })
      export class AppComponent {
        content = useIntlayer("app");
      }
      

      そして、テンプレートでは:

      src/app/app.component.html
      <div class="content">
        <h1>{{ content().title }}</h1>
        <p>{{ content().congratulations }}</p>
      </div>
      

      IntlayerのコンテンツはSignalとして返されるため、シグナルを呼び出すことで値にアクセスします:content().title

    6. コンテンツの言語を変更する

      コンテンツの言語を変更するには、useLocale関数によって提供されるsetLocale関数を使用できます。これにより、アプリケーションのロケールを設定し、それに応じてコンテンツを更新できます。

      言語を切り替えるためのコンポーネントを作成します:

      src/app/locale-switcher.component.ts
      import { Component } from "@angular/core";
      import { CommonModule } from "@angular/common";
      import { useLocale } from "angular-intlayer";
      
      @Component({
        selector: "app-locale-switcher",
        standalone: true,
        imports: [CommonModule],
        template: `
          <div class="locale-switcher">
            <select
              [value]="locale()"
              (change)="setLocale($any($event.target).value)"
            >
              @for (loc of availableLocales; track loc) {
                <option [value]="loc">{{ loc }}</option>
              }
            </select>
          </div>
        `,
      })
      export class LocaleSwitcherComponent {
        localeCtx = useLocale();
      
        locale = this.localeCtx.locale;
        availableLocales = this.localeCtx.availableLocales;
        setLocale = this.localeCtx.setLocale;
      }
      

      次に、このコンポーネントをapp.component.tsで使用します:

      src/app/app.component.ts
      import { Component } from "@angular/core";
      import { RouterOutlet } from "@angular/router";
      import { useIntlayer } from "angular-intlayer";
      import { LocaleSwitcherComponent } from "./locale-switcher.component";
      
      @Component({
        selector: "app-root",
        standalone: true,
        imports: [RouterOutlet, LocaleSwitcherComponent],
        templateUrl: "./app.component.html",
        styleUrl: "./app.component.css",
      })
      export class AppComponent {
        content = useIntlayer("app");
      }
      

    TypeScriptの設定

    Intlayerは、TypeScriptの利便性を高め、コードベースをより堅牢にするためにモジュール拡張を使用します。

    オートコンプリート

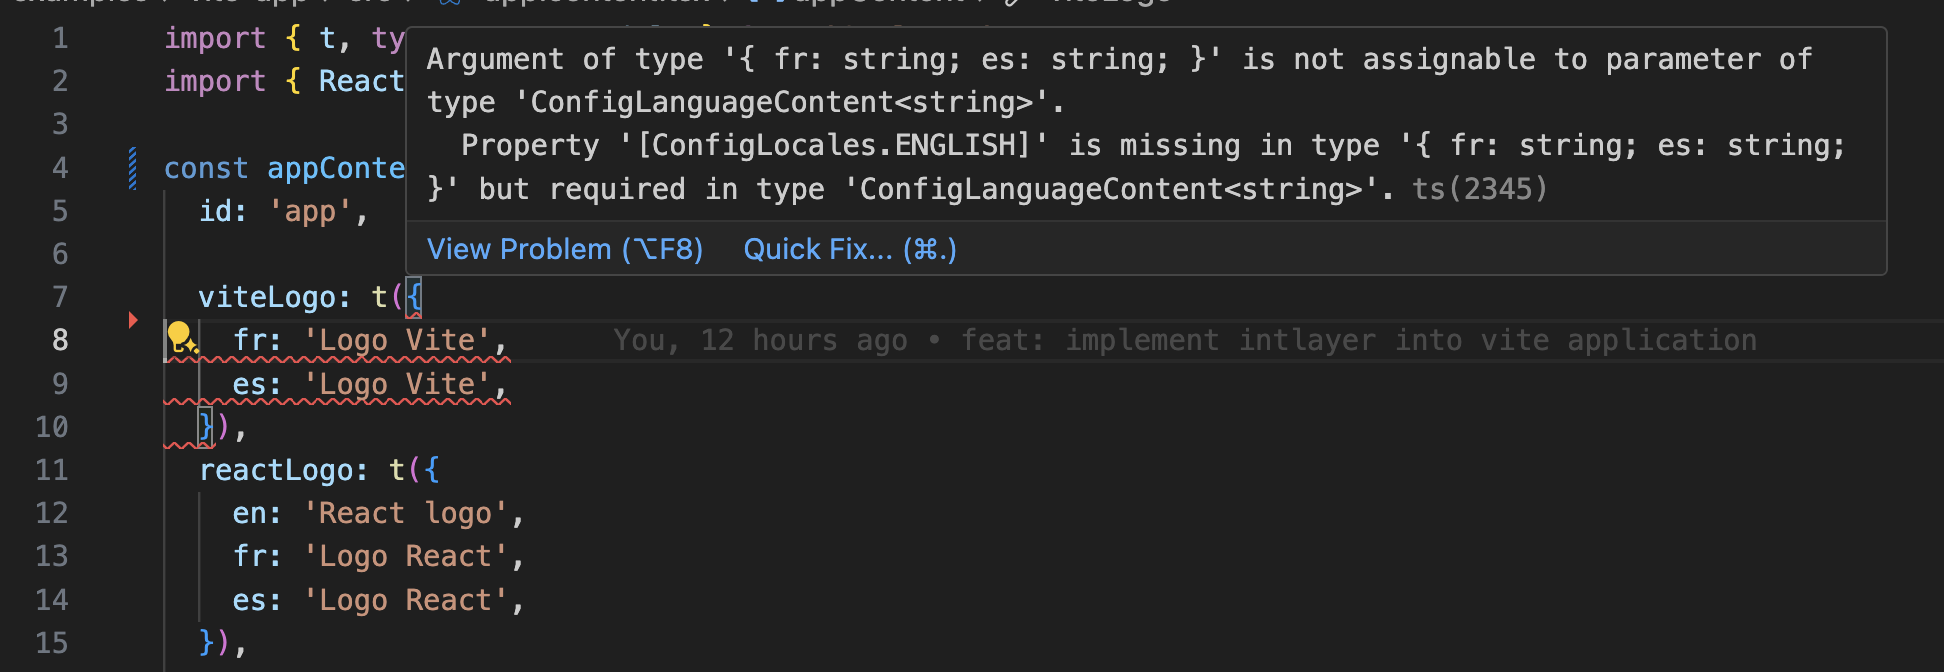
    翻訳エラー

    TypeScript構成に自動生成された型が含まれていることを確認してください。

    tsconfig.json
    {
      // ... 既存のTypeScript構成
      "include": [
        // ... 既存のTypeScript構成
        ".intlayer/**/*.ts", // 自動生成された型を含める
      ],
    }
    

    Gitの設定

    Intlayerによって生成されたファイルを無視することをお勧めします。これにより、Gitリポジトリへのコミットを避けることができます。

    これを行うには、.gitignoreファイルに次の指示を追加できます:

    bash
    # Intlayerによって生成されたファイルを無視
    .intlayer
    

    VS Code拡張機能

    Intlayerでの開発エクスペリエンスを向上させるために、公式のIntlayer VS Code拡張機能をインストールできます。

    VS Code Marketplaceからインストール

    この拡張機能は次を提供します:

    • 翻訳キーのオートコンプリート
    • 欠落している翻訳のリアルタイムエラー検出
    • 翻訳されたコンテンツのインラインプレビュー
    • 翻訳を簡単に作成および更新するためのクイックアクション

    拡張機能の使い方の詳細については、Intlayer VS Code拡張機能のドキュメントを参照してください。


    さらに進む

    さらに進むには、ビジュアルエディターを実装したり、CMSを使用してコンテンツを外部化したりできます。